- 一、概述
- 二、操作及示例
- 2.1、通过数据模版属性编写模版脚本
- 2.2、编写脚本示例
- 三、数据模版脚本接口API
- 3.1、加载事件
- 3.2、按钮加载事件【v3.2.4+支持】
- 3.3、按钮的前置事件
- 3.4、 按钮的后置事件
- 3.5、 自定义格式数据事件 【v3.1.11+】
- 四、常用脚本示例
- 4.1、设置数据列中其中一个栏目信息设置超链接
- 4.2、设置列表背景,字体,字体颜色
- 4.3、设置列表显示字段的字体,背景颜色 【v3.1.11+】
- 4.4、【自定义按钮】打开另外个表单页面
- 4.5、【自定义按钮】打开另外个数据模板管理配置出来的列表
- 4.5.1、方法一:默认的数据模版
- 4.5.2、方法二:自己写vue的模版和窗口
- 4.5.3、方法三:引用自定义对话框
- 4.6、 template DOM操作
- 4.7、组合表单事件处理
- 4.8、数据模板传递参数(或数据)到另外表单中
- 4.9、数据模板传递参数(或数据)到另外个数据模版
- 4.10 设置查询字段默认值进行查询数据
- 4.10.1、普通文本脚本范例
- 4.10.2、 日期范围查询脚本范例
- 4.10.3、 Groovry脚本范例
- 4.11 有个查询条件是否,选择是,就隐藏其中一列,选择否就隐藏另一列
- 4.12 导入数据demo
- 4.12 怎么刷新数据模版的数据
- 4.13、【自定义按钮】打开流程审批页面
- 4.13、顶部按钮某一个居右
一、概述
有时候我们需要对列表(树形)等数据进行格式展示,事件操作。
有时候我们需要操作按钮的前后置事件 或者添加自定义按钮,点击自定义按钮时需要将列表中选中行的数据导入打开的其他表单。
二、操作及示例
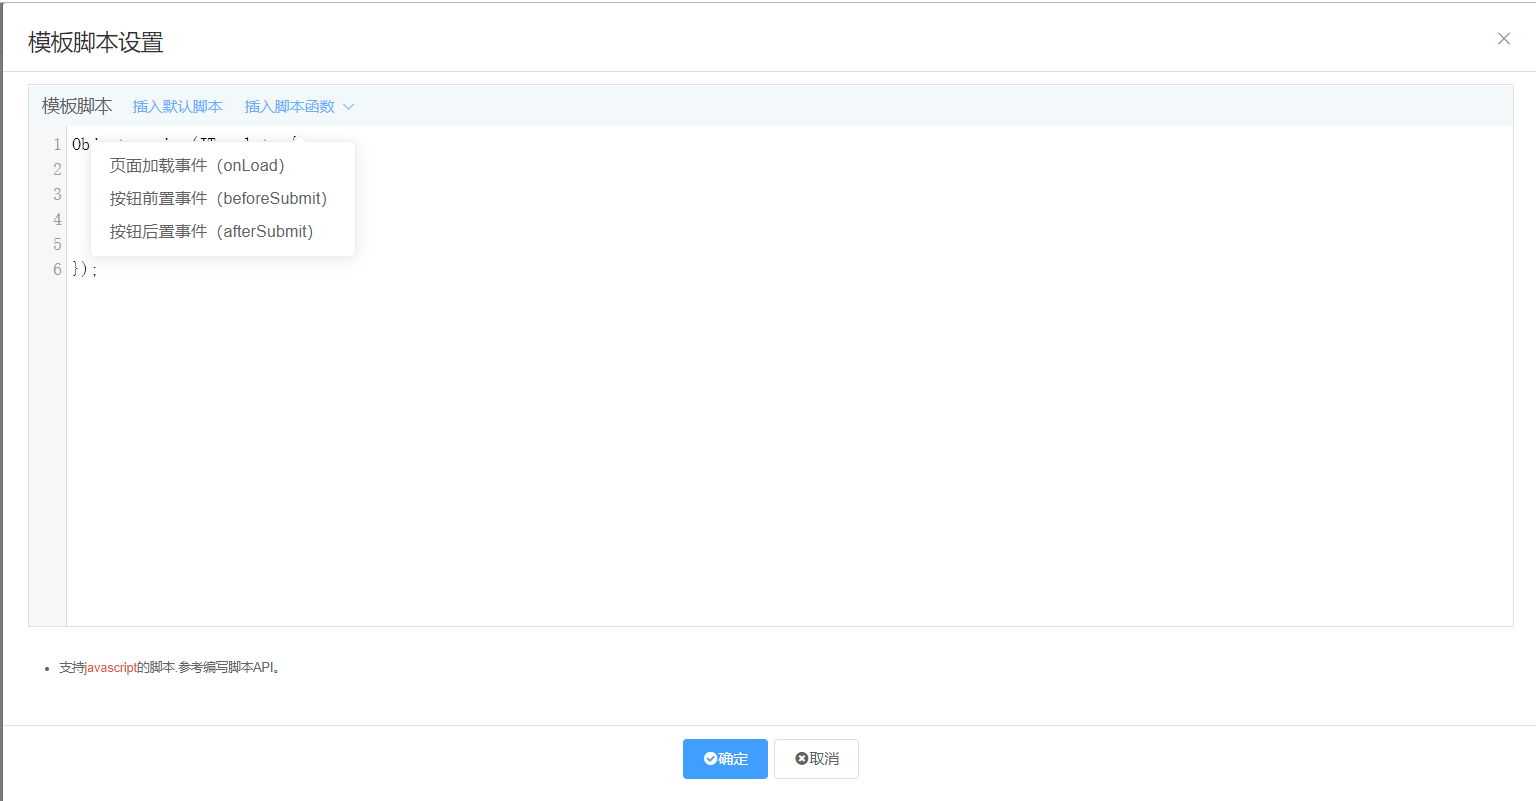
2.1、通过数据模版属性编写模版脚本
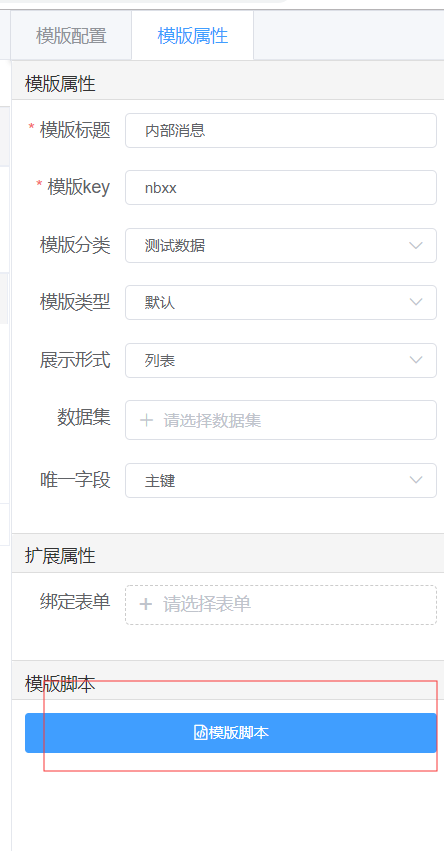
2.2、编写脚本示例
三、数据模版脚本接口API
统一说明:以下不再说明
template:是表单的vue实例数据,可以通过这个操作数据、dom等callback:数据回调,如果通过ajax异步提交需要回调,按钮等操作必须回调,不然操作没反应。返回true是回调成功,false表示回调失败,阻止继续操作【v3.1.8+】$request:可以通过this.$request 来ajax请求数据【v3.1.9+】
3.1、加载事件
 //模版加载事件
 onLoad:function(template){

  }
3.2、按钮加载事件【v3.2.4+支持】
 // 模版加载按钮事件
  onLoadActions:function(template, action, button, type, row){

  }
需要注意的是该脚本需要执行2次,第一次判断该字段的type(是否进行脚本判断),第二次加载再判断处理方式和数据
if(!type){
 return true
}
参数说明:
| 参数 | 说明 | 是否必须 | 可选值 |
|---|---|---|---|
| action | 按钮code,在使用页面传入的根据自己需求定义的值; | - | add、edit等 |
| button | 按钮相关数据,包含位置(position)等信息 | - | |
| type | 处理方式 | - | hidden: 隐藏,disabled: 禁用 |
| row | 单元格的数据,如果按钮位置(position)是‘manage’ 才有数据,其他类型为空 | - |
例子eg:
  onLoadActions:function(template, action, button, type, row){
    if(action === 'sefStartFlow'){//指定的按钮编码处理
      // 请不要去掉,该脚本需要执行2次判断使用
      if(!type){
          return true
      }
      //row 返回的数据要在Data返回的字段(一般为数据库名),如果没有可以添加隐藏域
      if(type==='hidden' && row.zi_duan_ === 'abc'){
        return true
      }
    }
  },
3.3、按钮的前置事件
 //按钮前置事件【必须回调】
  beforeSubmit:function(template,action,position, selection, data,callback){
    callback(true)
  }
表单按钮提交前触发,在具体的页面中调用.
参数说明:
| 参数 | 说明 | 是否必须 | 可选值 |
|---|---|---|---|
| action | 按钮code,在使用页面传入的根据自己需求定义的值; | - | add、edit等 |
| position | 按钮位置 【toolbar或manage】 | - | |
| selection | 如果按钮位置是‘toolbar’ 选中的主键值,‘manage’未空 | - | |
| data | 如果按钮位置是‘manage’ 当前行的数据 | - | |
| callback | funtion【必须】,一定要有回调方法,不然没反应 | 必须 | true,false |
3.4、 按钮的后置事件
 //按钮后置事件【必须回调】
  afterSubmit:function(form,action,postValue,callback){
    callback(true)
  }
表单按钮提交后触发,在具体的页面中调用.
参数说明:
| 参数 | 说明 | 是否必须 | 可选值 |
|---|---|---|---|
| action | 按钮code,在使用页面传入的根据自己需求定义的值; | - | add、edit等 |
| position | 按钮位置 【toolbar或manage】 | - | |
| selection | 如果按钮位置是‘toolbar’ 选中的主键值,‘manage’未空 | - | |
| data | 如果按钮位置是‘manage’ 当前行的数据 | - | |
| callback | funtion【必须】,一定要有回调方法,不然没反应 | 必须 | true,false |
3.5、 自定义格式数据事件 【v3.1.11+】
 // 自定义格式数据事件
  customFormatter:function(template, name, value, rowData, column){

  }
需要注意的是,先判断该字段的rowData,第二次加载再判断格式
if(!rowData){
 return true
}
参数说明:
| 参数 | 说明 | 是否必须 | 可选值 |
|---|---|---|---|
| name | 字段名 | - | |
| value | 当前单元格的值 | - | |
| rowData | 当前行数据 | - | |
| column | 当前字段属性 | - |
返回值目前仅处理v-html的数据
eg:
 //自定义格式数据事件
  customFormatter:function(template, name, value, rowData, column){
  //1:库存预警:1代表预警,2代表安全,当数据有1的时候,“库存”增加红色字体标识
    if(name==='ku_cun_' ){
     // 请不要去掉,该脚本需要执行2次判断使用
      if(!rowData){
      return true
      }
      if(rowData.stock_waring === '1'){

        return '<span style="color: red">'+(value||'')+'</span>'
      }else{
         return '<span>'+(value||'')+'</span>'
      }
    }
    //2:有效期:1代表快到期,2代表正常,当数据有1的时候,“名称”增加背景显示
    if(name==='cost_name_'){
      if(!rowData){
      return true
      }
      //rowData.validity_warning_  有空格数据
      if(rowData.validity_warning_ === '1'){
        debugger
        return `<div  style="color: #ecf5ff;background: red;">${ value}</div>`
      }else{
      return value
      }
    }
  },
四、常用脚本示例
4.1、设置数据列中其中一个栏目信息设置超链接
Object.assign(JTemplate,{
  //加载事件
  onLoad:function(template){
    //设置第一行超链接
    const column =  template.listConfig.columns[0]
    column.link =true
    template.$set(template.listConfig.columns,0,column)

    //绑定事件链接属性,更多属性看下面
   const initInterval = setInterval(() => {
      if (template.$refs.crud === null || template.$refs.crud === undefined){
        return
      }
      try {
    template.$refs.crud.$on('column-link-click',function(column, row){
      //TODO:你要处理事件 其中:column:当前行的数据,row:当前单元格的属性
     //跳转百度
      location.href='http://www.baidu.com'
    })
        clearInterval(initInterval)
      } catch (error) {
        clearInterval(initInterval)
      }
    }, 100)

  }

});
出现查找不到对象的
    //绑定事件链接属性,更多属性看下面
   const initInterval = setInterval(() => {
      if (template.$refs.crud === null || template.$refs.crud === undefined){
        return
      }
      //TODO:实现具体逻辑
      clearInterval(initInterval)
    }, 100)
4.2、设置列表背景,字体,字体颜色
//设置数据模版背景,字体,字体颜色
  const id =  'templateStyle' //保证唯一建议时间戳
  let styleTag = document.getElementById(id)
      if (!styleTag) {
        styleTag = document.createElement('style')
        styleTag.setAttribute('type', 'text/css')
        styleTag.setAttribute('id', id)
        document.head.appendChild(styleTag)
      }
  //添加的样式
  const newStyle ='' //这里编写你要添加的样式
  styleTag.innerText = newStyle
4.3、设置列表显示字段的字体,背景颜色 【v3.1.11+】
//自定义格式数据事件
  customFormatter:function(template, name, value, rowData, column){
    if(name==='biao_ti_'){
     if(!rowData){ // 判断是否是允许自定义
          return true
      }
       return '<span style="color: #dd5a43; font-size: 20px;">'+value+'</span>'
    }
  }
4.4、【自定义按钮】打开另外个表单页面
打开另外个表单:
 //按钮提交前置事件
  beforeSubmit:function(template, action, position, selection, data, callback){
    if(action ==='queryAdd'){
      //表单顶部按钮 如果不设置就显示为空
      template.editToolbars = []
      //表单key
      template.formKey = 'qdzdylcb'
      //表单是否只读,默认false
      template.readonly = false
      //主键值 如果新增则不写或留空,编辑则要传入值
      template.pkValue = ''
      //表单窗口打开(延迟下,避免数据没赋上)
      setTimeout(() => {
          template.dialogFormVisible = true
      }, 10)
    }else{
       callback(true)
    }
参数说明:
| 参数 | 数据类型 | 说明 | 默认值 |
|---|---|---|---|
| editToolbars | 数组 | 表单工具栏按钮 | 参考下面说明1️⃣ |
| formKey | 字符串 | 表单key | |
| readonly | 布尔 | 表单是否只读 | false |
| pkValue | 字符串 | 主键值 | |
| enableFormDialogSetting | 布尔 | 是否启用表单对话框设置 | false |
| formDialogSetting | 对象 | 表单对话框设置 | 参考下面说明2️⃣ |
| dialogFormVisible | 布尔 | 打开表单窗口 | false |
1️⃣、表单工具栏按钮说明:editToolbars
http://doc.bpmhome.cn/docs/ibps_v3_develop/ibps_v3_develop-1dbesslfq1dl2
| 属性 | 说明 | 可选值 |
|---|---|---|
| key | 按钮唯一Key | |
| button_type | 按钮类型 | close,save, print ,sefStartFlow,custom等 |
| label | 按钮文字 | eg:保存、关闭等 |
| icon | 按钮图标 | 字体库的图标 |
| type | 按钮类型 | primary / success / warning / danger / info / text |
//按钮配置
template.editToolbars = [{button_type:'save',label:'保存',key:'save'},{button_type:'close',label:'关闭',key:'close'}]2️⃣、启用表单自定义窗口[3.5.5+支持]
    //不启用默认窗口,以下面窗口为准
    template.enableFormDialogSetting = false
    //窗口配置
    template.formDialogSetting = {
        fullscreen:true,//是否全屏
        zoom:false,//是否缩放
        marginTop:'5',//距离顶部
        width:80,//宽
        height:80,    //高
    }
4.5、【自定义按钮】打开另外个数据模板管理配置出来的列表
4.5.1、方法一:默认的数据模版
//按钮提交前置事件
  beforeSubmit:function(template, action, position, selection, data, callback){
    if(action ==='queryAdd'){
      //数据模版key
      template.templateDialogKey = 'xxxx'
      //数据模版动态参数 eg:{'参数字段':'字段值'} 参数字段为数据库的字段值(一般包含下划线的)
      //template.templateDialogDynamicParams = {}
      //数据模版窗口打开(延迟下,避免数据没赋上)
      setTimeout(() => {
          template.templateDialogVisible = true
      }, 10)
    }else{
       callback(true)
    }
如果自定义对话框的窗口,需要按钮的回调方法 [
v3.5.3+支持]
dialogActionEvent:function(template, buttonKey,data){
          debugger
          switch (buttonKey) {
            case 'ok':// 确定
              // TODO:根据实际处理data数据
              alert(data)
              template.templateDialogVisible = false
              break
            case 'cancel':// 取消
              template.templateDialogVisible = false
              break
          }
}4.5.2、方法二:自己写vue的模版和窗口
//按钮提交前置事件
  beforeSubmit:function(template, action, position, selection, data, callback){
    if(action ==='queryAdd'){
          //自己写vue的模版和窗口,看下面的引用说明
        this.$dialog({
            template:'<xxx>内容</xxx>'
        },[options],[callback])
    }else{
       callback(true)
}4.5.3、方法三:引用自定义对话框
1、【最新版本】有这个代码组件,可以直接引用
2、如果【v3.5.1-】以下的版本没有该代码,需要把src\business\platform\data\templaterender\custom-dialog\dialog.vue代码复制到src\views\platform\data\custom-dialog\dialog.vue路径下
注意:
①、templateKey请根据实际的自定义对话框的key修改
②、点击确定按钮请根据数据处理data数据
Object.assign(JTemplate, {
  // 加载事件
  onLoad: function(template) {
    //注册自定义对话框
    this.$vue.component('ibps-customdialog-dialog', this.$import('/platform/data/custom-dialog/dialog.vue'))
  },
  customDialogTemplate: function(template) {
    return this.$vue.extend({
      data() {
        return {
          visible: true,
          templateKey:'dhklb06'//请根据实际的自定义对话框的key
        }
      },
      methods: {
        handleActionEvent(buttonKey, data) {
          debugger
          switch (buttonKey) {
            case 'ok':// 确定
              // TODO:根据实际处理data数据
              alert(data)
              this.closeDialog()
              break
            case 'cancel':// 取消
              this.closeDialog()
              break
          }
        },
        closeDialog() {
          this.visible = false
        }
      },
      render() {
        var h = arguments[0]
        return h('ibps-customdialog-dialog', {
          'attrs': {
            visible: this.visible,
            templateKey: this.templateKey
          },
          on: {
            close: this.closeDialog,
            'action-event': this.handleActionEvent
          }
        })
      }
    })
  },
  // 表单按钮前置事件
  beforeSubmit: function(template, action, position, selection, data, callback) {
    if (action === 'test1') {
      template.dialogTemplate = this.customDialogTemplate(template)
    }
    callback(true)
  }

})
扩展应用,可以弹窗其他弹窗
4.6、 template DOM操作
template可以操作表单vue的方法(methods)、属性、DOM元素和事件
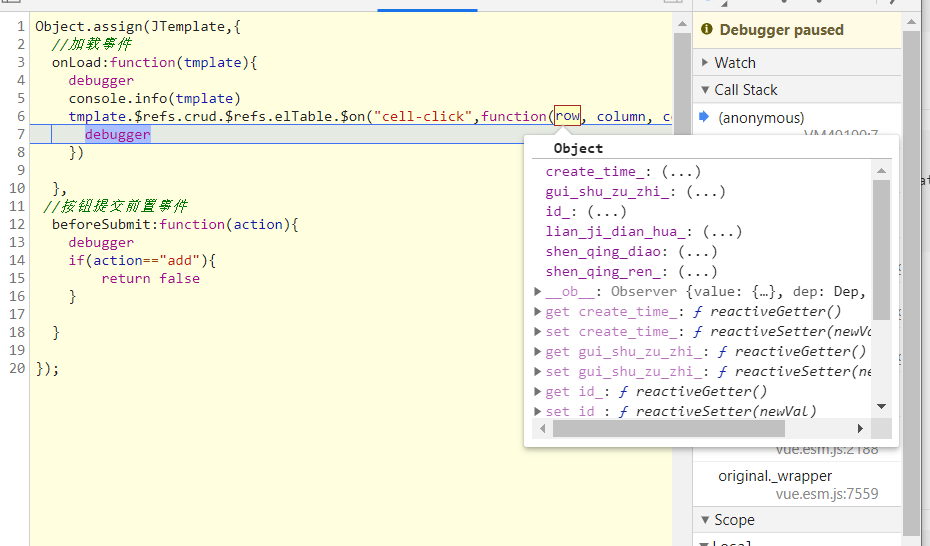
可以操作 element-ui的事件 https://element.eleme.cn/#/zh-CN/component/table
    template.$refs.crud.$refs.elTable.$on("cell-click",function(row, column, cell, event){
      debugger
    })
element-ui的事件: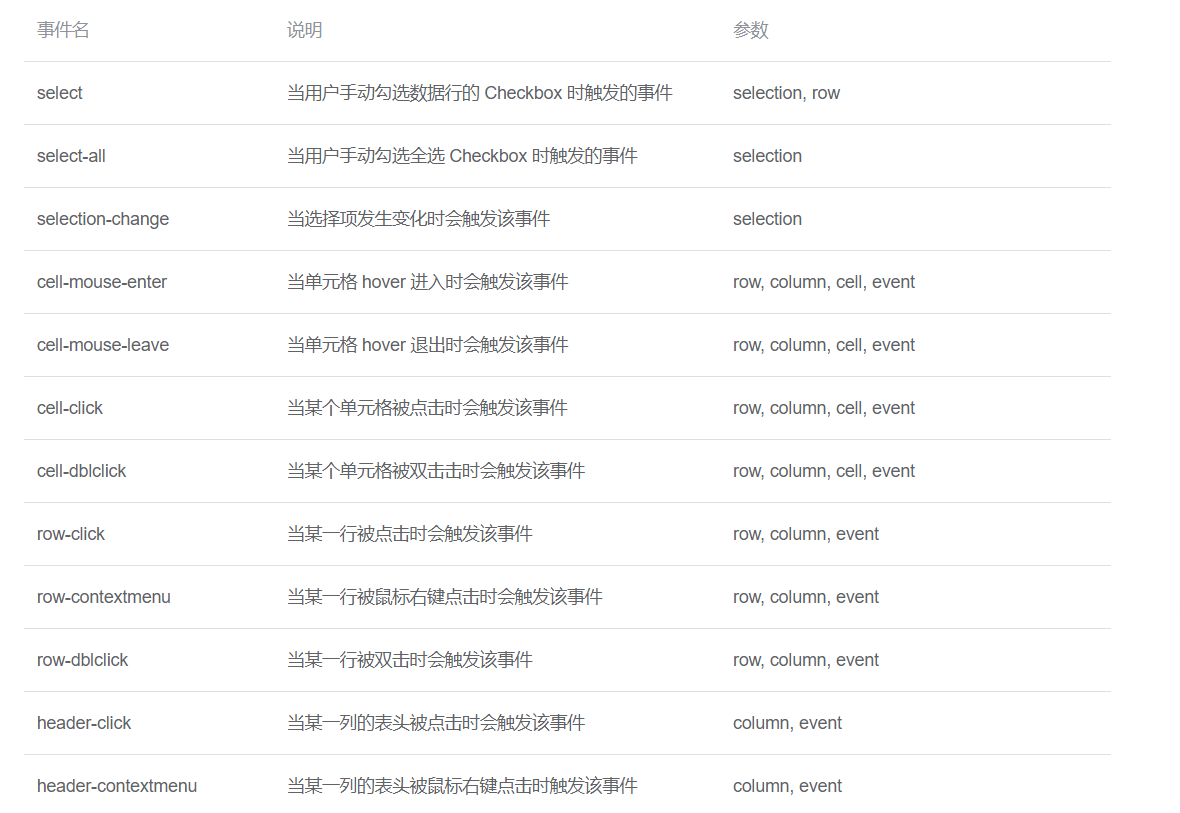
4.7、组合表单事件处理
如果你想调用列表的脚本可以类似这样写
template.$refs.templateList.beforeScript(action, position, selection, data, callback)4.8、数据模板传递参数(或数据)到另外表单中
(【v3.5.1+】支持)
如果你想调用列表的脚本可以类似这样写
1.在数据模板脚本写要传递的参数,将参数以对象的形式传进template.formDynamicParams中
 //按钮提交后置事件
  afterSubmit:function(template, action, position, selection, data, callback){
   //表单顶部按钮 如果不设置就显示为空
      template.editToolbars = []
      //表单key
      template.formKey = 'qdzdylcb'
      //表单是否只读,默认false
      template.readonly = false
      //主键值 如果新增则不写或留空,编辑则要传入值
      template.pkValue = ''

      //参数传递
      template.formDynamicParams={test:'xxx'}
     //数据模版窗口打开(延迟下,避免数据没赋上)
      setTimeout(() => {
          template.dialogFormVisible = true
      }, 10)
    callback(true);
}2.在表单脚本中用form.params获取
 Object.assign(JForm,{
  //加载事件
  onLoad:function(form){
  //可以获取传递的参数
    console.log(form.params)
    //这个最后一个`test` 是根据上面写的参数决定的
     console.log(form.params.test)
  }
})
4.9、数据模板传递参数(或数据)到另外个数据模版
1、比如级联参数的传递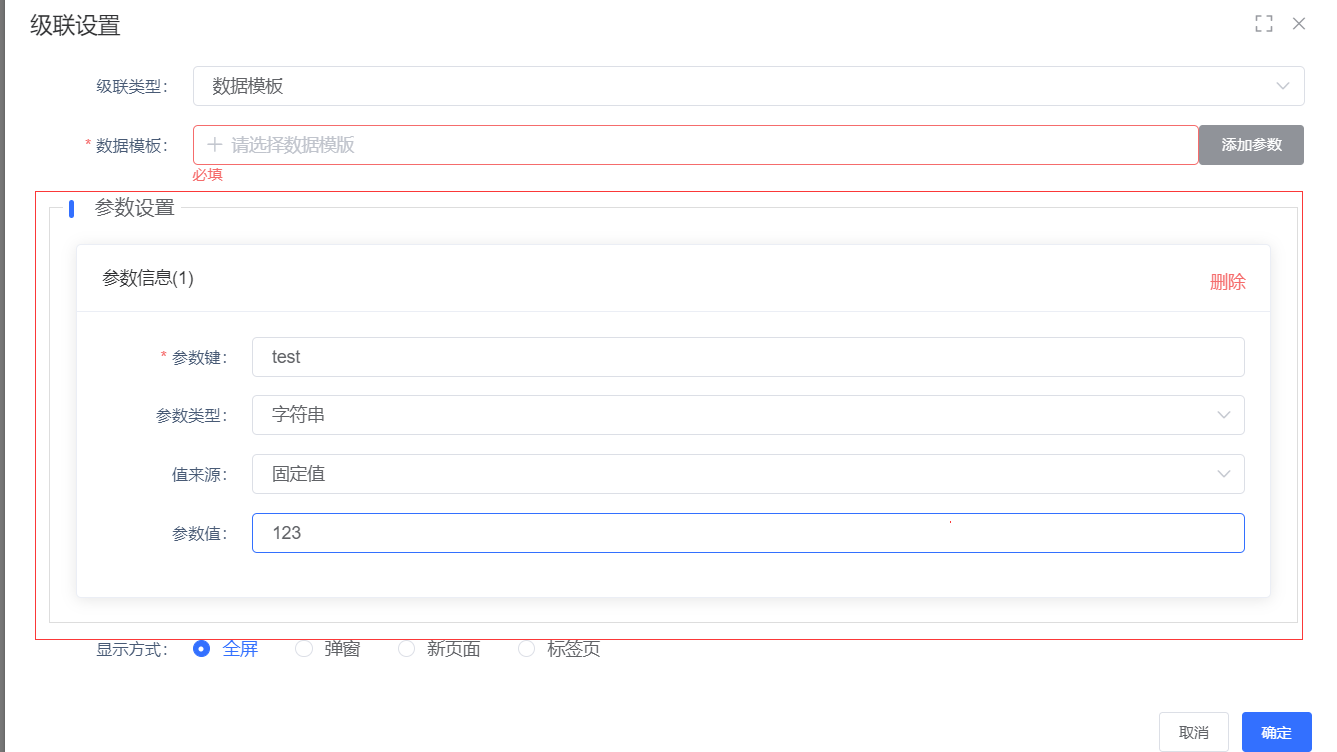
2.在数据模版脚本中用template.params获取
 Object.assign(JTemplate,{
  //加载事件
  onLoad:function(template){
  //可以获取传递的参数
    console.log(template.params)
    //这个最后一个`test` 是根据上面设置的参数决定的
     console.log(template.params.test)
  }
})
表单传递参数也类似,只不过换成
form.params
4.10 设置查询字段默认值进行查询数据
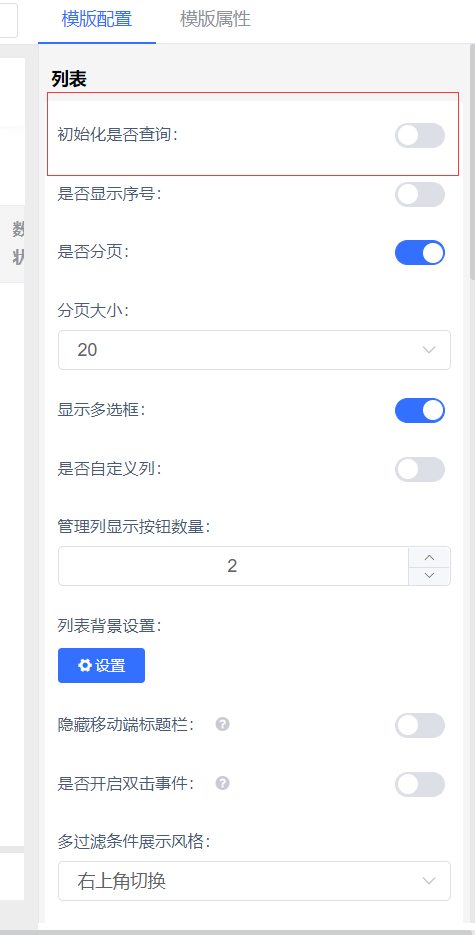
直接调用会出现查询2次问题,把初始化查询,设置为否,手动调用查询,避免重复查询
如何查找查询条件的key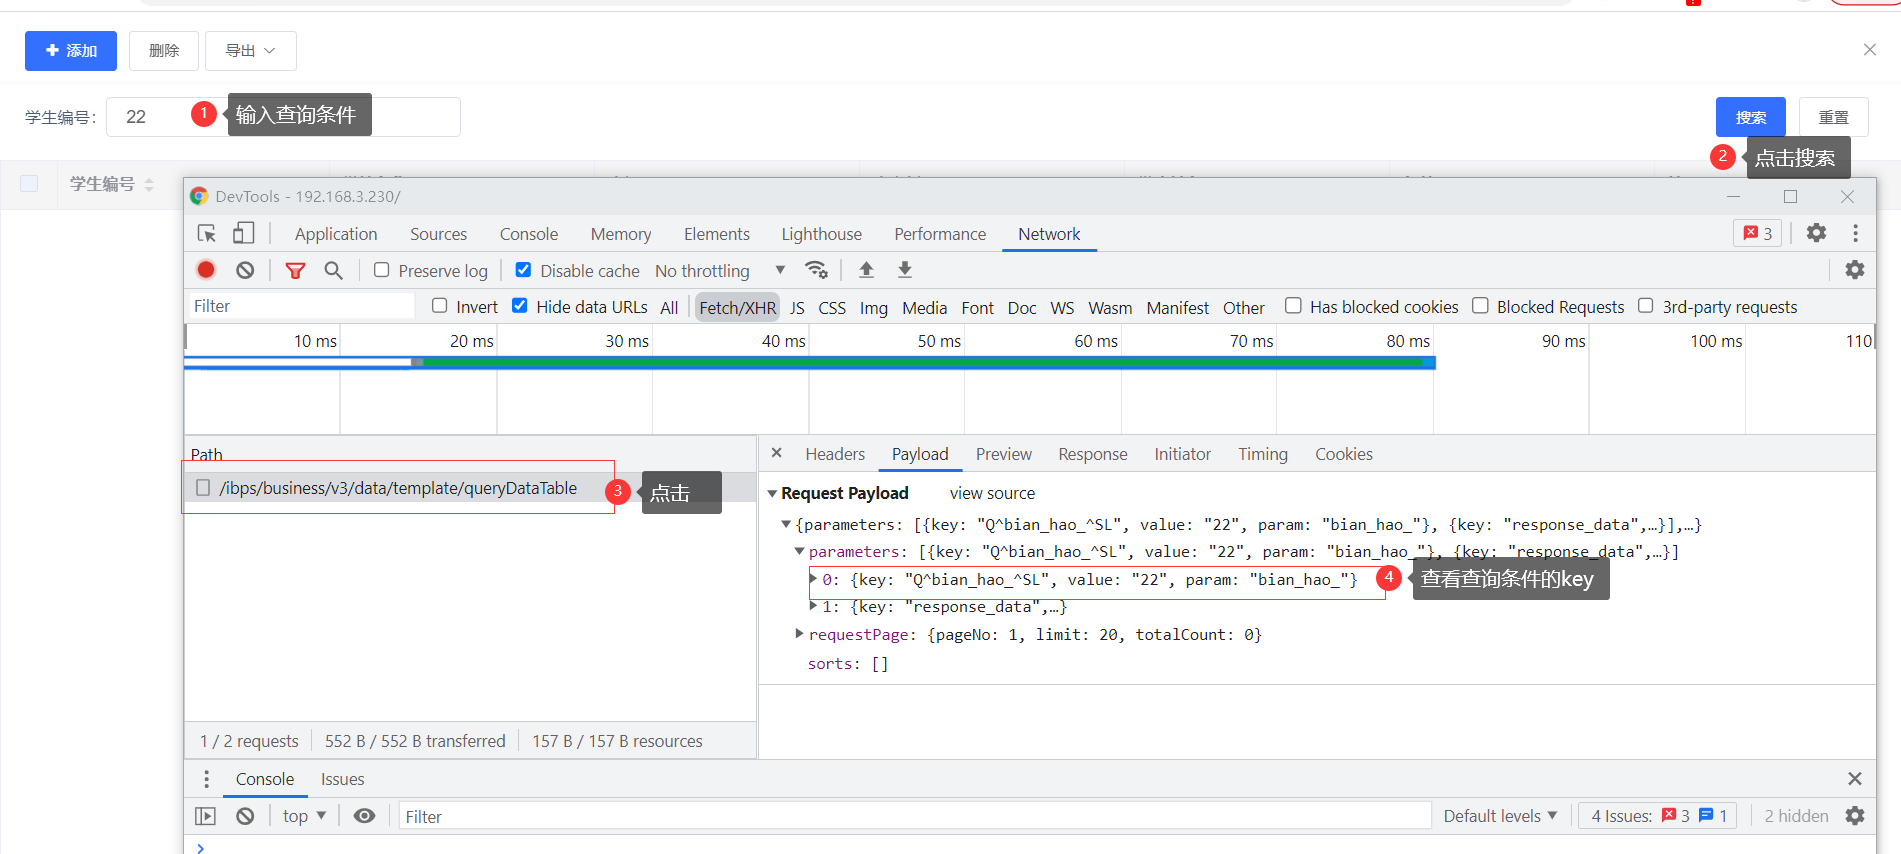
4.10.1、普通文本脚本范例
Object.assign(JTemplate,{
  //加载事件
  onLoad:function(template){
      setTimeout(() => {
        const searchForm = template.$refs.searchForm
      //'Q^text_^SL  这个参数是文本字段的查询名
        searchForm.$set(searchForm.params,'Q^text_^SL','abc')
        //手动查询
        template.search()
        }, 100)

  }
});
4.10.2、 日期范围查询脚本范例
Object.assign(JTemplate,{
  //加载事件
  onLoad:function(template){
      setTimeout(() => {
        const searchForm = template.$refs.searchForm
        //设置默认值:'daterange-prefix0' 这是日期范围控件第几次出现参数
        searchForm.$set(searchForm.params,'daterange-prefix0',['2022-06-01','2022-06-11'])
        searchForm.$set(searchForm.params,'daterange-prefix1',['2022-06-01 12:23:22','2022-06-11 22:22:11'])
        //手动查询
        template.search()

        }, 100)

  }
});
例:结束时间为当前时间,开始时间和结束时间相差一个月
Object.assign(JTemplate, {
  // 加载事件
  onLoad: function(template) {
    setTimeout(() => {
      const searchForm = template.$refs.searchForm
      const startDate1 = new Date()
      startDate1.setMonth(startDate1.getMonth() - 1)
      const startDate = this.formatDate(startDate1, 'yyyy-MM-dd HH:mm:ss')
      const endDate = this.formatDate(new Date(), 'yyyy-MM-dd HH:mm:ss')

      // 设置默认值:'daterange-prefix0' 这是日期范围控件第几次出现参数
      searchForm.$set(searchForm.params, 'daterange-prefix0', [startDate, endDate])
      // 手动查询
      template.search()
    }, 100)
  },
  formatDate: function(date, fmt) {
    var o = {
      'M+': date.getMonth() + 1, // 月份
      'd+': date.getDate(), // 日
      'H+': date.getHours(), // 小时
      'm+': date.getMinutes(), // 分
      's+': date.getSeconds(), // 秒
      'S': date.getMilliseconds() // 毫秒
    }
    if (/(y+)/.test(fmt)) fmt = fmt.replace(RegExp.$1, (date.getFullYear() + '').substr(4 - RegExp.$1.length))
    for (var k in o) { if (new RegExp('(' + k + ')').test(fmt)) fmt = fmt.replace(RegExp.$1, (RegExp.$1.length === 1) ? (o[k]) : (('00' + o[k]).substr(('' + o[k]).length))) }
    return fmt
  }
})
4.10.3、 Groovry脚本范例
//加载事件
  onLoad:function(template){
     this.$request({
        url:'/business/v3/form/def/getScriptValue',
        method: 'post',
        data:  {
         //比如获取当前公司的ID脚本
         'script': `csScript.getCompanyId('')`
         }
      }).then(response => {
         //处理数据返回的逻辑
       if(response.data){
             const searchForm = template.$refs.searchForm
             //'Q^org^SL  这个参数是字段的查询名
            searchForm.$set(searchForm.params,'Q^org^SL',response.data)
            //记得手动查询
            template.search()
           }else{
             //记得手动查询
         template.search()
         }
        }).catch(error => {
            console.log(error)
        })

  }
4.11 有个查询条件是否,选择是,就隐藏其中一列,选择否就隐藏另一列

脚本:
Object.assign(JTemplate, {
  // 加载事件
  onLoad: function(template) {
      //备份原来的字段
    const tempColumns = JSON.parse(JSON.stringify(template.listConfig.columns))
    setTimeout(() => {
      const searchForm = template.$refs.searchForm
    //绑定查询条件字段的change searchForm.$children[0].$children[0].$children[0].$children[0].$children[0].$children[1].$on('change', (value) => {
        if (value === 'Y') {
          //删除第2个字段
          template.listConfig.columns.splice(1, 1)
        } else {
         //还原字段
          template.listConfig.columns =  JSON.parse(JSON.stringify(tempColumns))
        }
      })
    }, 500)
  }
})
4.12 导入数据demo
1、vue代码编写【以下代码参考】
<template>
  <el-form
    ref="importForm"
    v-loading="dialogLoading"
    :element-loading-text="$t('common.load.loading')"
    :model="importForm"
    :label-suffix="$IBPS.formLabelSuffix"
    :label-position="$IBPS.formLabelPosition"
    :label-width="$IBPS.formLabelWidth"
    class="import-form"
    @submit.native.prevent
  >
    <el-row :gutter="10">
      <el-col :span="24">
        <el-form-item :label="'请选择文件'" required>
          <el-upload
            ref="upload"
            :action="fileUploadAction"
            accept=".xml"
            :on-change="handleChange"
            :file-list="importForm.fileList"
            :auto-upload="false"
            :show-file-list="false"
          >
            <el-row :gutter="5">
              <el-col :span="20">
                <el-input v-model="filedName" :placeholder="$t('common.placeholder.select')" readonly class="ibps-mr-5">
                  <i v-if="filedName" slot="suffix" class="el-icon-circle-close" @click.stop="clearFiles" />
                </el-input>
              </el-col>
              <el-col :span="4">
                <el-button>请选择文件</el-button>
              </el-col>
            </el-row>
            <div slot="tip" class="el-upload__tip">
              导入说明
            </div>
          </el-upload>
        </el-form-item>
      </el-col>
    </el-row>
    <el-row style="float: right;">
      <el-col :span="24">
        <ibps-toolbar
          :actions="toolbars"
          @action-event="handleActionEvent"
        />
      </el-col>
    </el-row>
  </el-form>
</template>

<script>
import setting from '@/setting.js'
import { importData } from '@/api/demo/list'
import ActionUtils from '@/utils/action'

export default {
  props: {
    visible: {
      type: Boolean,
      default: false
    },
    id: String
  },
  data() {
    return {
      fileUploadAction: setting.fileUploadAction,
      formName: 'importForm',
      dialogLoading: false,
      importForm: {
        fileList: []
      },
      filedName: '',
      toolbars: [
        { key: 'cancel' },
        { key: 'import', type: 'primary' }
      ]
    }
  },
  watch: {
    visible: {
      handler: function(val, oldVal) {
        this.dialogVisible = this.visible
        this.importForm.fileList = []
      },
      immediate: true
    }
  },
  beforeDestroy() {
    this.importForm = null
    this.toolbars = null
  },
  methods: {
    handleActionEvent({ key }) {
      switch (key) {
        case 'import':
          this.handleImport()
          break
        case 'cancel':
          this.closeDialog()
          break
        default:
          break
      }
    },
    // 提交保存数据
    handleImport() {
      const file = this.$refs.upload.uploadFiles[0].raw
      importData(file).then(response => {
        this.$emit('callback', this)
        ActionUtils.saveSuccessMessage(response.message, (rtn) => {
          if (rtn) {
            this.closeDialog()
          }
          this.clearFiles()
        })
      }).catch((err) => {
        console.error(err)
      })
    },
    handleChange(file, fileList) {
      this.filedName = file.name
      if (fileList.length > 1) {
        fileList.splice(0, 1)
      }
    },
    clearFiles() {
      this.$refs.upload.clearFiles()
      this.filedName = ''
    },
    // 关闭当前窗口
    closeDialog() {
      this.$parent.$parent.$parent.onClose(() => {})
      this.$refs[this.formName].resetFields()
      this.clearFiles()
    }
  }

}
</script>
2、模版脚本
Object.assign(JTemplate, {
  // 加载事件
  onLoad: function(template) {
      this.$vue.component('import-data', this.$import('/demo/import-data/index'))
      },
  // 按钮提交前置事件
  beforeSubmit: function(template, action, position, selection, data, callback) {
    if (action === 'importData') {
      this.$dialog({
        data() {
          return {
          }
        },
        template: '<import-data  />'
      }, {
        dialog: {
          appendToBody: true,
          width: '50%',
          top: '10vh',
          title: '导入数据',
          'custom-class': 'ibps-dialog-70'
        }
      }, (tpl) => {
        template.dialogTemplate = tpl
      }).catch((_this) => {
        _this.visible = false
        template.dialogTemplate = null
      })
    } else {
      callback(true)
    }
  }

})
最新版本(v3.5.4+)支持自定义footer
footer: (_this, h) => {
          return h('ibps-toolbar', {
            slot: 'footer',
            props: {
              actions: [
                { key: 'cancel' },
                { key: 'import', type: 'primary' }
              ]
            },
            on: {
              'action-event': (data) => {
                _this.getDialogRef().handleActionEvent(data)
              }
            }
          })
        }
4.12 怎么刷新数据模版的数据
template.search()4.13、【自定义按钮】打开流程审批页面
Object.assign(JTemplate,{
  //加载事件
  onLoad:function(template){
     // 先注入流程组件
     const templateForm = this.$import('/platform/bpmn/form/dialog.vue')
     this.$vue.component('template-form', templateForm)
  },
 //按钮提交前置事件
  beforeSubmit:function(template, action, position, selection, data, callback){
   //custom为自定义按钮key
   if ('custom' === action) {
     let taskId ='1087332136203059200'
      //获取列表的流程任务id,需要修改任务id的列表字段,修改taskId=data.taskId的值。注意:该例子是行内的按钮,顶部按钮是数组
       if(data){
        taskId=data.taskId
       }
      this.$dialog({
        data() {
          return {
            taskId:taskId  //流程任务id
          }
        },
        methods: {
           closeDialog(){
             this.$parent.$parent.visible=false
             template.search()
           }
         },
        template: '<template-form  :task-id="taskId"  @close="closeDialog"/>'
      }, {
        dialog: {
         fullscreen:true,
         'custom-class':"bpmn-formrenderer-dialog"
        }
      }, (tpl) => {
        template.dialogTemplate = tpl
      }).catch((_this) => {
        _this.visible = false
         template.search()
        template.dialogTemplate = null
      })
    }
    callback(true)
  }
});
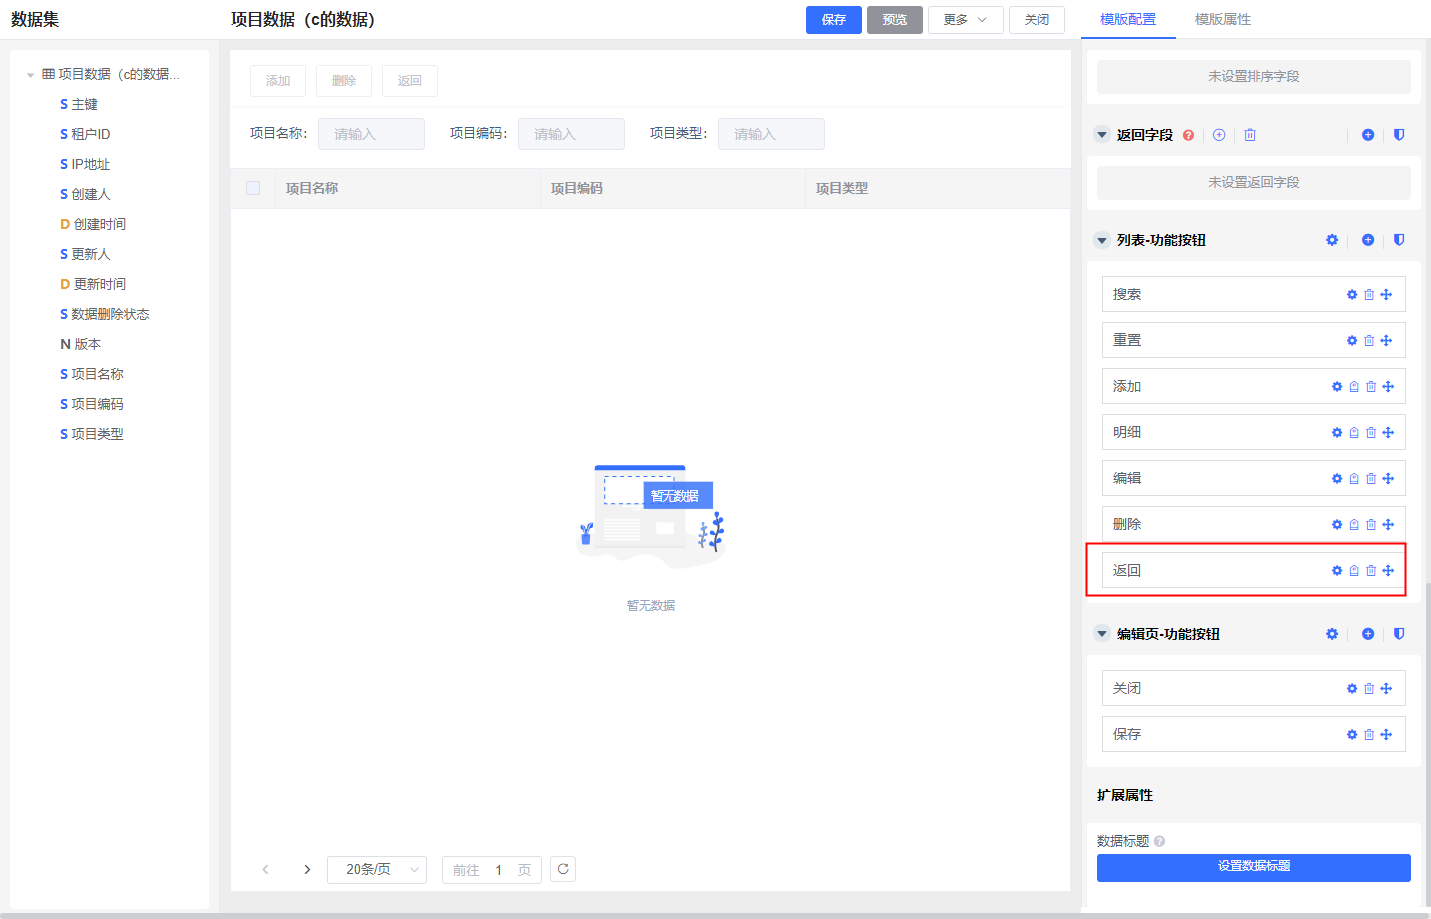
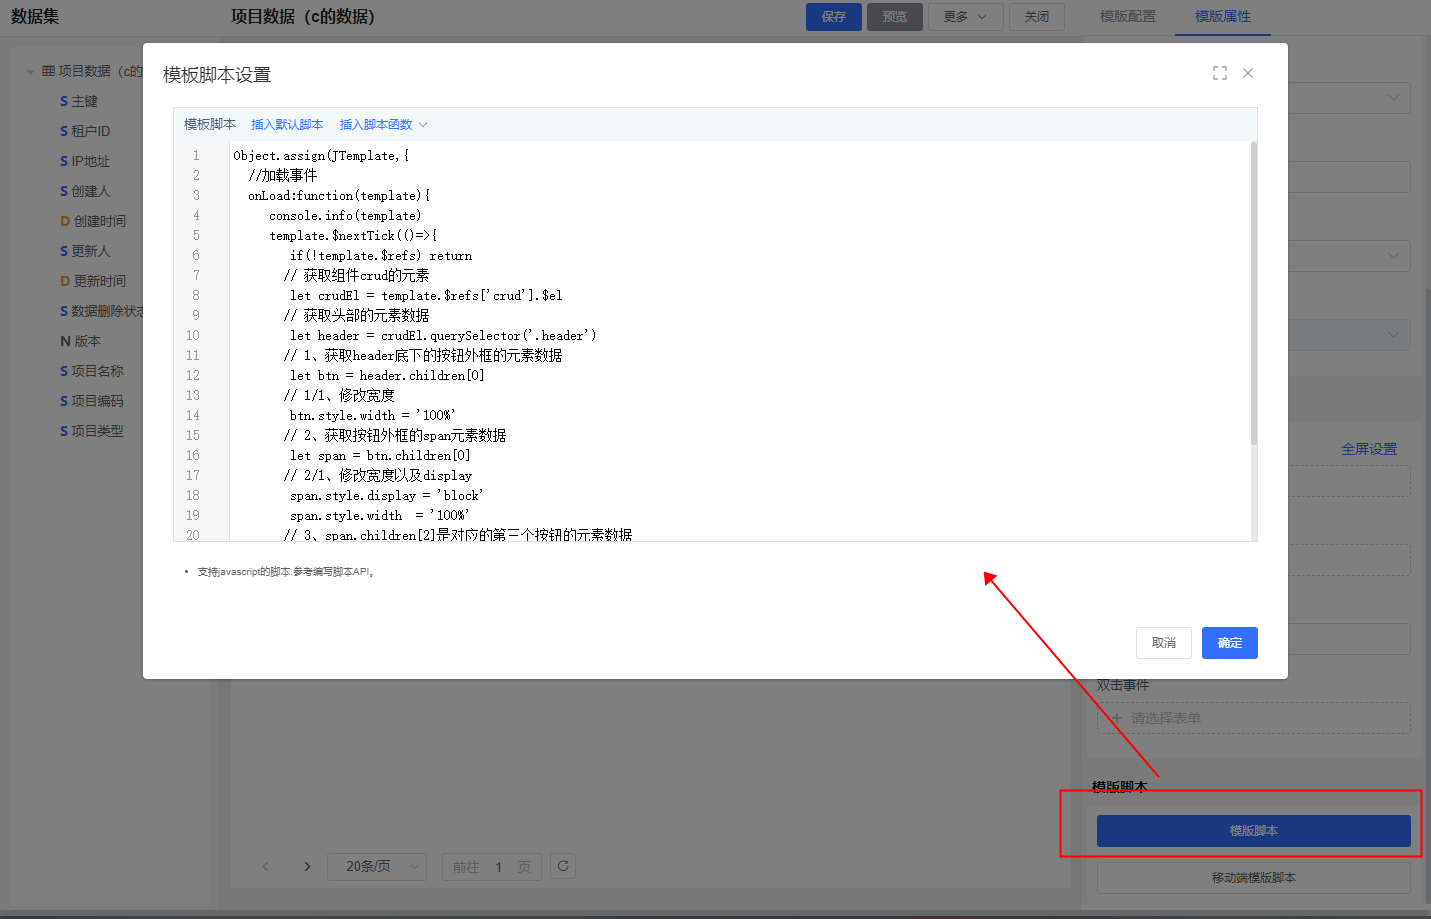
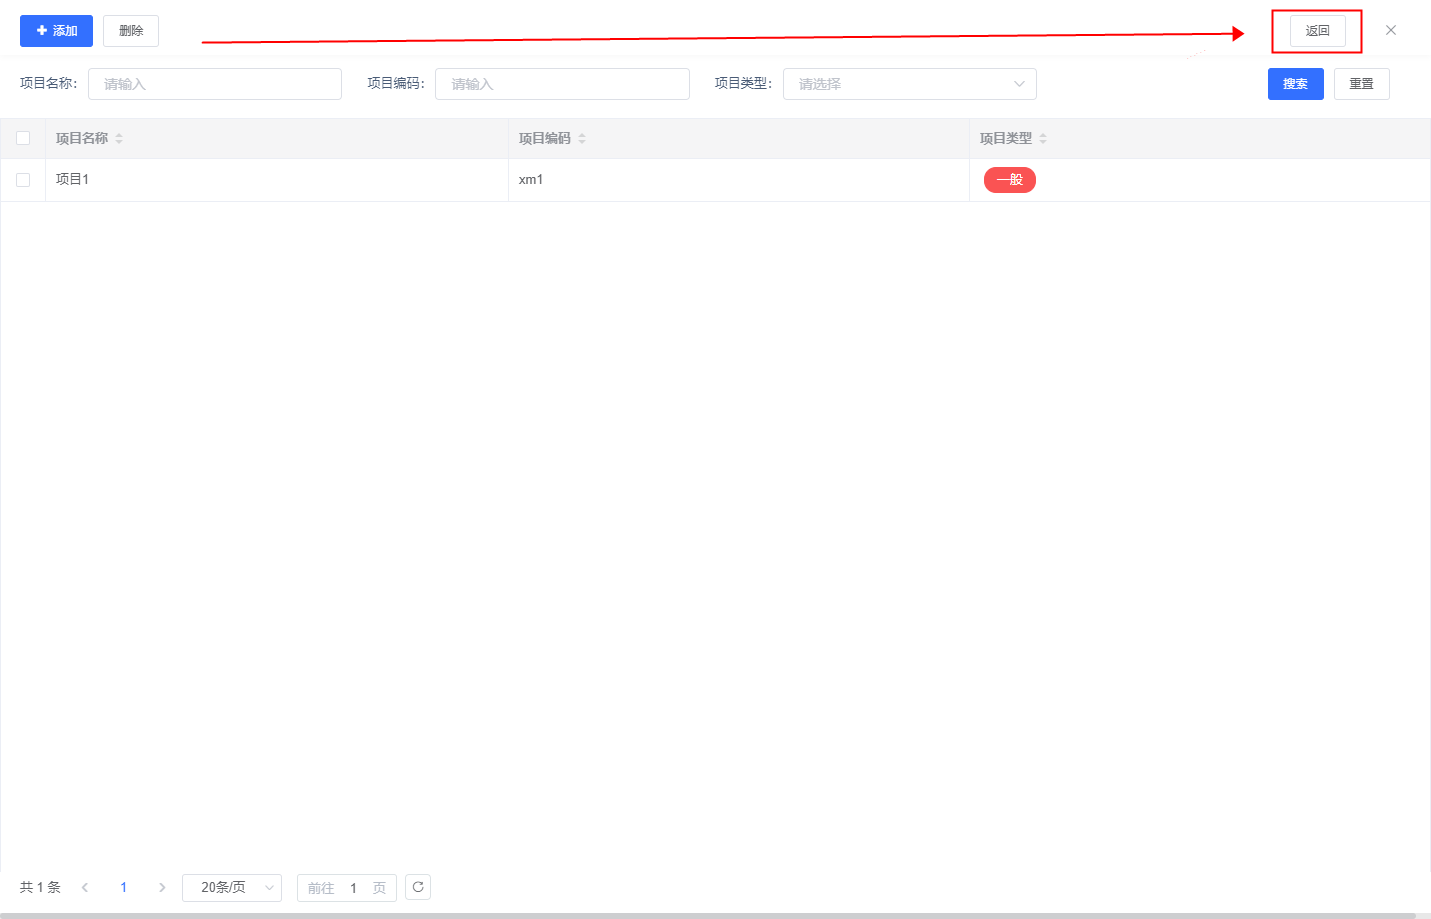
4.13、顶部按钮某一个居右
Object.assign(JTemplate,{
  //加载事件
  onLoad:function(template){
    console.info(template)
    template.$nextTick(()=>{
        if(!template.$refs) return
     // 获取组件crud的元素
        let crudEl = template.$refs['crud'].$el
     // 获取头部的元素数据
         let header = crudEl.querySelector('.header')
     // 1、获取header底下的按钮外框的元素数据
         let btn = header.children[0]
     // 1/1、修改宽度
         btn.style.width = '100%'
     // 2、获取按钮外框的span元素数据
         let span = btn.children[0]
     // 2/1、修改宽度以及display
        span.style.display = 'block'
        span.style.width  = '100%'
     // 3、span.children[2]是对应的第三个按钮的元素数据
         span.children[2].style = 'float:right;margin-right:100px;'

     // 需要修改按钮居右,首先需要将父级的宽度继承([1/1]、[2/1]),其次修改当前按钮居右(3)
    })
  }
});